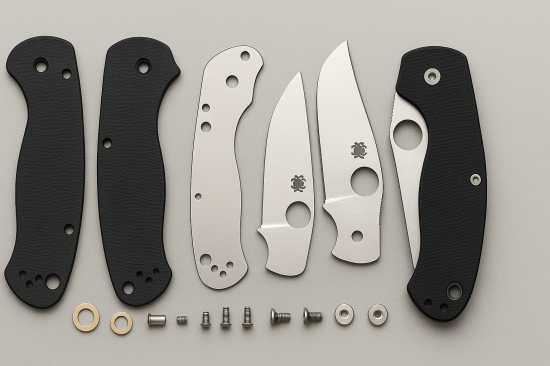
How to Disassemble and Reassemble Your Spyderco Without Damaging It

By Logan M. Fraser – Custom Knife Modder & Spyderco Parts Specialist, Based in Calgary, Alberta, Canada
This is the 21st blog of the Spyderco Knife blog series. You can check the other blogs I’ve written here: https://spydercoparts.com/blogs
If you’re planning to disassemble your Spyderco knife, there’s a right way to do it—and a lot of wrong ones. Whether you’re cleaning, modding, or replacing parts, doing it wrong can lead to stripped screws, lock issues, or even blade misalignment.
As someone who disassembles dozens of Spydercos each month, I’ll show you how to do it properly—without damaging your knife.
What You Need Before You Start ⚖️
Tools:
Torx drivers: T6 and T8 (Wiha or Wera recommended)
Non-marring pry tool (e.g., plastic guitar pick)
Magnetic tray for screws
Microfiber cloth and isopropyl alcohol (for cleaning)
Loctite Blue 242 (for reassembly)
🚨 Avoid cheap driver kits—they’re the fastest way to strip screws.
Step-by-Step: Disassembly 🔄
1. Remove the Pocket Clip
Start here to prevent obstruction during body screw removal.
2. Loosen the Pivot and Body Screws
Use the correct Torx size and apply even downward pressure
Loosen each screw slowly to avoid stripping
Place screws in a labeled tray
3. Separate the Scales Gently
Use a plastic pry tool to lift the scale from the liners
For compression lock knives, be careful near the stop pin and lock tab
4. Remove the Blade Assembly
Pull the blade and pivot out with washers intact
Take note of washer order (e.g., phosphor bronze outside, Teflon inside)
🚫 Do NOT force parts—Spyderco knives are built with tight tolerances. If something resists, pause and reassess.
Step-by-Step: Reassembly ✂️
1. Clean and Prep
Wipe all parts with alcohol
Apply light oil to pivot and washers
2. Reinstall the Blade and Pivot
Insert blade and washers in correct order
Ensure the pivot is seated fully before tightening
3. Replace the Backspacer and Liners
Align screw holes carefully
Reinstall the backspacer if used
4. Reattach Scales and Body Screws
Lightly thread all screws before fully tightening
Adjust blade centering before applying Loctite to the pivot
5. Reinstall Pocket Clip
Finish by installing the clip in your preferred position.
Troubleshooting Tips 🫠
Blade rubbing? Loosen pivot slightly and re-center
Lock not engaging? Ensure pivot isn’t overtightened
Gritty action? Clean washers again or inspect for debris
My Pro Advice for Long-Term Performance 🧱
Always apply Loctite Blue 242 to the pivot screw to prevent loosening
Use a sharpie to mark screw positions before removal
Store factory screws in a separate bag if upgrading
If you’re planning a scale or hardware swap, check out https://spydercoparts.com—our precision-fitted parts are tested on real Spyderco models to maintain exact tolerances.
Why Factory Tolerances Matter ⚙️
Every Spyderco knife is tuned for blade tension, lockup, and centering. Improper reassembly can cause:
Off-center blades
Lock rock or late engagement
Stripped threads
That’s why I always recommend taking photos of the disassembly process—helps with reassembly and avoids mistakes.
Helpful Sources 🔍
https://spyderco.com: Their knife care page includes factory maintenance guidelines
https://forum.spyderco.com: Learn from user experiences and mod insights
These resources help confirm part orientation and disassembly order for specific models.
Final Thoughts 🔪
Disassembling and reassembling your Spyderco doesn’t have to be intimidating. With the right tools and a methodical approach, you can clean, upgrade, or service your knife without risking performance—or voiding its potential.
Have a question about disassembly steps, scale fitment, or tuning after reassembly? Drop it in the comments below—and let me know what you’d like covered in next week’s Spyderco Knife Blog Series.

