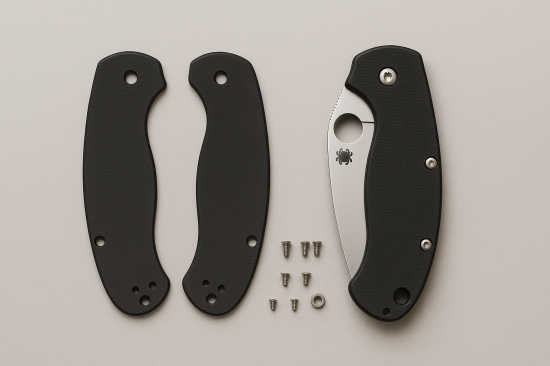
A Step-by-Step Guide to Replacing Spyderco Knife Handles

By Logan M. Fraser – Custom Knife Modder & Spyderco Parts Specialist, Based in Calgary, Alberta, Canada
This is the 18th blog of the Spyderco Knife blog series. You can check the other blogs I’ve written here: https://spydercoparts.com/blogs
If you’ve ever wanted to replace your Spyderco knife handles—whether for style, grip, or weight—you’re not alone. Modding a Spyderco is one of the most satisfying upgrades a user can make. As a full-time modder, I’ve done this for dozens of models, and today I’ll walk you through it step-by-step.
Whether you’re swapping FRN for G10, upgrading to titanium, or going for micarta scales with better grip, this guide covers everything you need to know.
Step 1: Choose Compatible Scales 🔮
First, make sure your replacement handles are:
Made for your exact Spyderco model (e.g., Para 3, PM2, Sage 5)
Designed for the right lock type (compression, lockback, liner, etc.)
Checked for nested or full liners
If you’re unsure about compatibility, sites like https://spydercoparts.com list scale types with full fitment notes. This helps avoid issues with screw alignment or pivot seating.
Step 2: Gather Your Tools 🔨
Torx drivers (usually T6, T8)
Microfiber cloth
Non-marring pry tool (plastic spudger or guitar pick)
Tweezers or magnetic tray
Loctite Blue 242 (optional)
Make sure you’re working on a soft surface, like a silicone mat, to prevent scratching.
Step 3: Disassemble the Knife Carefully ⚖️
Remove pocket clip
Unscrew all body screws in order (store them in a tray)
Gently lift one scale off
Remove pivot screw and gently pull apart the blade and washer stack
🚨 Go slow—some models like the Manix 2 use caged ball locks that have spring tension.
Step 4: Clean and Inspect Internals 💧
Wipe down washers and liners
Check for burrs or wear on the pivot
Use rubbing alcohol to clean factory grease
This is your chance to lube the pivot or polish washers for smoother action.
Step 5: Install New Scales 🌟
Place the liner and washer stack back into the scale
Seat the pivot and blade, then sandwich with the second scale
Insert screws loosely to ensure alignment
Gradually tighten while checking for blade centering
Add a dab of Loctite Blue to the pivot screw if desired
Ensure that the compression or lockback mechanism still engages properly. Test deployment before full torque-down.
Step 6: Reattach Clip and Final Tune-Up 💼
Install the pocket clip in your preferred position
Check blade centering and pivot tension
Open/close 20–30 times to seat everything naturally
If action feels tight, back off the pivot 1/16 of a turn.
My Pro Tips for a Smooth Swap 🧱
Don’t over-tighten scale screws—it can warp liners
Use compressed air to remove micro-debris before reassembly
Test with and without backspacers if your kit includes both
We stock scale hardware kits and backspacers at https://spydercoparts.com to match popular handle upgrades. Every part is test-fitted for reliable performance.
Trusted Sources for More Info 🔍
https://spyderco.com: Factory specs and exploded views
https://forum.spyderco.com: Great tips from real modders
These resources are helpful if you’re unsure about screw types, assembly order, or model specifics.
Final Thoughts 🔪
Swapping handles isn’t just cosmetic—it’s a practical upgrade that lets you tailor your knife to your style and use. Whether you’re chasing grip, weight savings, or a custom look, the process is easier than most people think.
Got a question about scale compatibility or install technique? Drop it in the comments below. And let me know what you want covered next in the Spyderco Knife Blog Series.

